
git init: Create Your First Repository Step by Step
Learn how to use git init to create your first local repository from scratch: what it does, how to make your first commit, and how it differs from git clone.
You have a folder with your project and you want to start saving its history without fear of breaking it. Good news: you don’t need GitHub yet, or an account anywhere, or an internet connection. A single command turns that folder into a Git repository, and in this post I’ll explain what git init is, your first repository, and how to reach your first commit without touching anything you shouldn’t.
Before you start, you need two things: Git installed (if typing git --version gives you a number, you have it) and knowing how to navigate to your project folder with cd. That’s all you need.
What Does git init Actually Do?
git init creates a hidden subfolder called .git inside your project, and that’s where Git stores the entire history of your changes. It doesn’t modify your files, doesn’t delete anything, and doesn’t send anything to any server. Your code stays exactly the same as before.
Think of a repository as a normal folder with a “version recorder” turned on. Every time you save a checkpoint, Git notes what existed at that moment so you can come back to it later. That recorder lives entirely inside .git. If you delete that subfolder, your project goes back to being a normal folder and you only lose the history, not the code.
The key word here is local. A local repository lives on your computer and works offline. It’s yours and no one else’s until you decide to upload it.
git init or git clone? Which One Do You Need?
Use git init when you’re starting from scratch with code that’s already on your machine, and use git clone when you want to copy a repository that already exists on a server. That’s the whole difference, but it’s worth seeing side by side:
git init | git clone <url> | |
|---|---|---|
| Starting point | A folder of yours, with or without files | A repository that already exists online |
| What it does | Creates an empty .git in your folder | Downloads the full repo with its entire history |
| Needs a remote URL? | No | Yes, the repository’s URL |
| Typical case | New project from scratch | Pulling down a project from a teammate or GitHub |
If you’re reading this because you just created a folder and want to put it under version control, your command is git init. git clone is for when someone else’s work already exists somewhere and you’re just bringing it to your machine.
Step 1: Initialize the Repository
Navigate to your project folder and run git init, specifying the name of the initial branch. I’ll use an example folder called mi-proyecto:
# Entra en la carpeta de tu proyecto
cd mi-proyecto

# Inicializa el repositorio y nombra la rama inicial "main"
git init -b main
The -b main flag (short for --initial-branch=main) tells Git to call the first branch main. A branch is simply a named line of work; for now, it’s enough to know that your history will grow on top of main. If you don’t include -b, Git uses the name configured in init.defaultBranch, and if you haven’t configured anything, that default name is still master in every Git version released to date (it’s planned to change to main when Git 3.0 arrives, which hasn’t been released yet). By setting it yourself, you don’t depend on each machine’s configuration.
When you run it, you’ll see something like this:
Initialized empty Git repository in /Users/tu-usuario/mi-proyecto/.git/That’s all it does. The .git folder has appeared (hidden, hence the leading dot) and your repository now exists. It’s still empty of history: there’s no commit saved yet.
Step 2: Create a File and Check the Status
git status tells you what state each file is in with respect to Git. It’s the command you’ll use the most. Let’s create a file first:
# Crea un README con una línea de texto
echo "# Mi proyecto" > README.md

# Pregunta a Git qué ve
git status
The response will look something like this:
On branch main

No commits yet

Untracked files:
  (use "git add <file>..." to include in what will be committed)
	README.md

nothing added to commit but untracked files present (use "git add" to track)
Two words show up here that you need to understand well. An untracked file is one that Git sees in the folder but isn’t watching yet: it knows it’s there, but it doesn’t record its changes. A tracked file is one that’s already part of the repository and whose modifications Git logs. Your README.md is untracked because you just created it and haven’t told Git to pay attention to it yet.
That “haven’t told it yet” is exactly the next step.
Step 3: Stage the Changes with git add
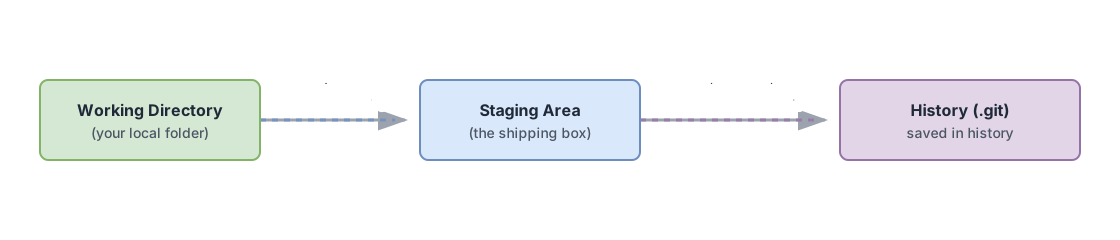
git add moves a file into the staging area, the zone where you prepare what will go into the next commit. Here’s the analogy that clicked for me when I started: imagine you’re about to ship a package. The staging area is the box. git add is putting things into the box, and the commit (the next step) is sealing it and labeling it. You can put things in and take them out of the box as many times as you want before sealing it.
# Mete el README en la caja (la staging area)
git add README.md
This command doesn’t print anything, which is unsettling at first. Ask Git again:
git statusOn branch main
No commits yet
Changes to be committed:
(use "git rm --cached <file>..." to unstage)
new file: README.mdREADME.md has gone from “untracked” to “changes to be committed”. It’s now in the box, ready for the commit.
When you have several files and want to add them all at once, there’s git add ., which adds everything in the current folder and below it:
# Añade TODOS los archivos nuevos y modificados de la carpeta
git add .
At the beginning, it’s better to git add <file> one at a time, so you see exactly what you’re staging. git add . is convenient, but it’s also the easiest way to accidentally slip something you didn’t want into a commit.
Step 4: Your First Commit
git commit takes everything in the staging area and saves it as a permanent point in the project’s history. A commit is a snapshot of your files at a specific moment, along with a message explaining what you changed and why.
# Cierra la caja y guarda el punto de control con un mensaje
git commit -m "Primer commit: añade README"
The -m flag lets you write the message right there, in quotes. The output will look something like this:
[main (root-commit) a3f9c21] Primer commit: añade README
 1 file changed, 1 insertion(+)
 create mode 100644 README.md
That a3f9c21 is the commit’s hash: a unique identifier that Git generates for each point in the history. It’s shown abbreviated, but underneath it’s a longer code made up only of numbers and letters from a to f. You don’t have to memorize it; it’s there for you to reference that commit whenever you want to go back to it. (root-commit) means it’s the very first one, the root of your history.
To see it as a clean one-liner:
# La historia del proyecto, un commit por línea
git log --oneline
a3f9c21 (HEAD -> main) Primer commit: añade READMECongratulations, you just went from “folder with files” to “first commit done”. HEAD -> main tells you that you’re sitting on the main branch and that this is the latest commit.
Before moving on, try the add and commit cycle yourself in this interactive exercise. You learn a lot more by typing it than by reading it:
Loading exercise...
Common Mistakes When Starting Out
These are the stumbles almost everyone hits in the first week. Recognizing them now saves you a good chunk of frustration.
Running git init Inside Another Repository
If you run git init in a folder that’s already inside another Git repository, you end up with nested repos and a mess that’s hard to untangle: changes in the inner folder don’t show up where you expect. Before initializing, check with git status that you’re not already inside a repository. If Git responds with a status instead of saying it’s not a repository, stop: there’s already one there.
Forgetting git add and Thinking the Commit “Can’t See” Your Files
This is the most common one. You create a file, run git commit directly, and Git responds that there’s nothing to save. It’s not broken: an untracked file doesn’t go into a commit until it’s been through git add. If git status shows something under “Changes to be committed”, it will be included; if it’s still under “Untracked files”, it won’t.
Thinking git commit -a Includes New Files
You’ll see the shortcut git commit -a -m "..." (or git commit -am "...") floating around, which promises to skip git add. Be careful with this: -a only automatically stages modifications and deletions of files Git already tracks. It doesn’t touch a new, untracked file. Since the file in your first commit will be new, git commit -a won’t include it, and you’ll need a prior git add regardless.
Committing Without Having Identified Yourself
Git records who made each commit, with your name and email. If you’ve never configured them, Git will ask you to do so before it lets you continue. It’s a one-minute setup you do once per machine, and it’s explained in the guide to configuring Git for the first time.
Confusing git init with “Creating a Repo on GitHub”
git init creates a local repository, on your computer. Creating a repository on GitHub creates a remote one, on their servers. They’re distinct, complementary things: you version locally first with git init, and later (if you want) you connect that local repo to a remote one to upload your work. GitHub is optional; git init works perfectly fine on its own, offline.
What Now?
You now have a repository with its first commit, and that’s the most intimidating part, already done. From here you repeat the cycle (git add, git commit) every time you make progress, and at some point you upload your work to a remote with git push. I break down that full flow, from local folder to GitHub, in the post on how git add, commit, and push work together. And if you want the bigger picture before continuing, start with the Git guide for your first steps.
If you’d rather learn this by actually typing it, with exercises graded on the spot, the full course is Git from Zero to Professional. It’s designed for exactly this point: you’ve just made your first commit and want to solidify it.
Checklist for Your First Repository
- Git installed and
git --versionresponds with a number - You’re inside the right folder with
cdbefore initializing -
git init -b mainrun and the.gitfolder created -
git statusshows your files as untracked at first - The files you want to save are staged with
git add - First commit made with
git commit -m "..."and a clear message -
git log --onelineshows your commit with its hash
Frequently Asked Questions
Does git init Upload Anything to the Internet?
No. git init works only on your computer and creates a local repository inside the .git folder. It doesn’t send anything to any server and doesn’t need a connection. For your code to reach the internet, you later need to connect the repo to a remote and use git push.
Can I Undo a git init?
Yes, and it’s surprisingly simple: delete the hidden .git folder that was created when you initialized. Once you remove it, the folder goes back to being a normal directory with no version control, and your code files remain intact. The only thing you lose is the commit history you had saved.
Why Is the Branch Called main Instead of master?
For years, Git’s default initial branch was called master, and main was adopted later as the more common name. With git init -b main you choose the name yourself and don’t depend on whatever Git version each machine has. Functionally, a main branch and a master branch are identical; only the name changes.
Do I Need a GitHub Account to Use git init?
No. Git and GitHub are different things. Git is the version control tool that runs on your machine, and git init is purely local. GitHub is an online service for hosting repositories and collaborating. You can use Git throughout an entire project without ever opening a GitHub account.
What Exactly Is the .git Folder?
It’s where Git stores everything: every commit, every version of every file, the branches, and the repository’s configuration. It’s hidden (the leading dot hides it on most systems) because you almost never need to touch it by hand. As long as that folder exists inside your project, your folder is a Git repository; if you delete it, it stops being one.
Related articles
Git from scratch: what it is, why it exists, and how to make your first commit
Git is a mental model before it's a list of commands you memorize. This guide covers everything from the why to your first commit, assuming zero prior knowledge.
Setting Up Git for the First Time: Name, Email, and Editor
The exact commands to configure Git before your first commit: user.name, user.email, the default editor, and what --global means versus local.
git add, commit, and push: Git's basic workflow explained
What git add, git commit, and git push actually do, and why they're three separate steps: a change's journey through Git's four areas, explained from scratch.