
Git from scratch: what it is, why it exists, and how to make your first commit
Git is a mental model before it's a list of commands you memorize. This guide covers everything from the why to your first commit, assuming zero prior knowledge.
The first day I touched Git was at a bootcamp. The instructor wrote git add . && git commit -m "first commit" && git push on the whiteboard and said, “do this every time you finish something.” I did it for three months without understanding what any of those words meant. Until one day I accidentally deleted the folder with the final project.
There was no copy. There had been no git push. I had run git init and nothing else.
That day I understood the problem Git solves. But it took me two more years to understand the mental model underneath it. This post is what I wish I had read that first week.
The six headaches you have (and Git takes them away)
Before I tell you what Git is, you need to know what problems it solves. If you’ve never worked with version control, you’ve probably suffered through several of these without putting a name to them:
-
You break something that worked and can’t go back. You modify three files to fix a bug, the bug gets fixed but now login doesn’t work. You don’t know what you touched. There’s no global Ctrl+Z for an entire project.
-
You don’t know what changed since yesterday. The code worked on Friday. Not on Monday. Someone touched something, but your team’s commits say “fix” and “update” and there’s no way to know what happened.
-
You and a teammate edited the same file at the same time. You both see changes that don’t line up. One overwrites the other. Whoever saves second loses their work. If you’ve ever had
login-final.js,login-final-v2.js, andlogin-final-THIS-ONE.jsin your folder, you know what I’m talking about. -
Your laptop breaks. Or you spill coffee on it. Or Windows Update decides today is the day. Without an external copy of the project, you’ve lost everything. Months of work. I’m not exaggerating: I know two people this has happened to.
-
You want to try a crazy idea without breaking what works. That ambitious refactor, that library swap, that “what if I rewrite the auth module from scratch.” But you’re afraid of touching something and not being able to go back. So you don’t do it.
-
A bug reaches production and you need to know who changed what. Your boss asks. The client is angry. And there you are staring at a
git logthat only says “fix” and “update” because nobody wrote commit messages that meant anything.
If you’ve lived through at least three of these six scenarios, welcome to the club. We’ve all been there.
The four things Git does (and none of them is magic)
The six problems above group into four capabilities Git gives you. Learn them, because every time you feel a pain with your code, you’re going to file it under one of these four boxes:
Recovery. Traveling back in time. You deleted a file three days ago and didn’t notice. With Git, getting it back is one command. Your laptop died and the project was synced to a remote: your work is still there. You broke login while touching something else and don’t know what changed: Git tells you exactly which lines were modified and when.
Parallelism. Working without stepping on each other. You build your feature on your branch. Your teammate builds theirs on theirs. Neither of you touches the other’s code until you both decide to merge them. When you do merge, Git warns you if there’s a conflict and gives you tools to resolve it.
Auditing. Knowing who changed every line, and why. Every change you save in Git carries your name, your email, the exact date, and a message explaining what you did. Six months from now, when someone asks “why does the export button have a 500ms setTimeout?”, git blame points you to the exact line and the commit that introduced it; with that identifier, git show gives you the message that justifies it.
Exploration. Trying ideas without fear. You create a new branch, do whatever you want, break everything if you feel like it, and if you don’t like the result you delete it and go back to main as if nothing happened. Your main code is never touched until you decide the idea is good.
Every time you feel a pain with your code, ask yourself: is this a recovery problem, a parallelism problem, an auditing problem, or an exploration problem? Once you know which box it falls into, you know which Git tool you’re going to need.
Version control: the tool category nobody told you about in bootcamp
Git isn’t the only program that does these four things. Git belongs to a category of tools called version control systems, or VCS for short. If you want the concept in depth (what version control is and why it exists as a category), I cover it in what is version control. Here it’s enough for you to grasp the idea.
A code editor is a category. VS Code, Neovim, Zed, and WebStorm are different products within that category. Version control works the same way: it’s the category, and Git is the product almost everyone uses today. Others existed too, like CVS or Subversion, but that’s history you don’t need to get started.
What you do need to understand is the difference between the two major types of version control: centralized and distributed. Because that difference explains why Git behaves the way it does.
Centralized vs distributed: why Git works even without WiFi
In a centralized system, a single server holds the project’s complete history. Every developer connects to that server to see what’s happened, to save their changes, and to recover earlier versions. The server is the single source of truth. If the server goes down, the entire team loses access to the history. If the server loses its data, the project loses its memory.
In a distributed system, like Git, every developer has a complete copy of the history on their own machine. The history doesn’t live on a server: it lives on your laptop, on mine, and on a shared copy we use to sync with each other. That shared copy is called a remote, and it’s nothing more than another copy of the project living on another machine, usually on GitHub or GitLab.
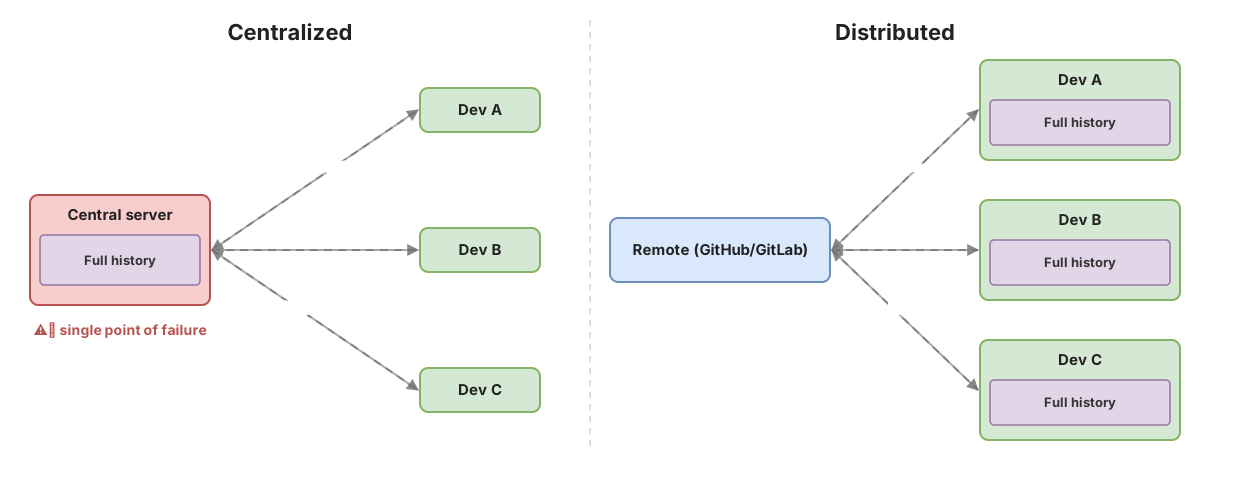
The consequences of this difference are huge:
-
Being offline doesn’t block you. Since the history lives on your machine, you can make commits, view the log, travel back in time, and create branches without WiFi. You only need the remote when you want to sync your work with the rest of the team.
-
There’s no single point of failure. If GitHub’s server goes down (it happens), your work isn’t lost. When it’s back, you sync. If a developer’s laptop breaks, everyone else has the complete history and can rebuild what’s missing.
-
Every copy is a backup. If there are three developers on the team and each one has run
git clone, there are at least four complete copies of the project’s history: the three laptops plus the remote. A fire in the office doesn’t erase the project.
This isn’t theory. It’s part of why Git exists. In 2005, the Linux kernel was developed using a tool called BitKeeper, owned by a private company. When that company pulled the free license, Linus Torvalds was left with no way to coordinate a huge community of developers spread across the world. So he built Git in a matter of days: distributed from minute zero, free, and designed for teams where nobody depends on a single server or a single company.
That’s the mental model. And the mental model is exactly what lets you direct Git with judgment instead of fighting it blindly. If you’d rather learn by doing, with interactive simulations instead of reading and correcting your own mistakes step by step, that’s exactly what we built in the course Git: from zero to professional. This article covers the first block; the course takes you all the way to branches, merges, and teamwork without being afraid to touch anything.
Okay, you’ve convinced me. How do I install it?
Three paths, same destination. Pick yours:
macOS. If you have Homebrew installed, open your terminal and type:
brew install gitIf you don’t have Homebrew, installing Git from the official installer at git-scm.com also works. Or, if you prefer, macOS ships with a version of Git that activates the first time you run git in the terminal: the system will offer to install the Command Line Tools.
Windows. Download the installer from git-scm.com. During installation, accept the default options. The installer includes Git Bash, a terminal that gives you access to Git commands on Windows.
Linux. From your distribution’s package manager:
# Debian/Ubuntu
sudo apt install git

# Fedora
sudo dnf install git

# Arch
sudo pacman -S git
Regardless of your system, verify everything works with a single command:
git --versionIf you see something like git version 2.45.0 or similar, Git already lives on your machine. That number is your first milestone: there’s no turning back now.
If instead you see command not found, something went wrong in the installation. Repeat the previous step. It’s rare for it to fail if you followed the instructions. If it does fail, the error message will tell you exactly what to search for on Google: don’t panic, it’s normal.
Tell Git who you are
Git is installed, but it doesn’t know who you are. And it needs to know, because every change you save from now on will carry your name and your email. It’s Git’s way of answering the question “who did this, and when?” six months from now.
It’s two lines. Literally two:
git config --global user.name "Alex Ramos"
git config --global user.email "alex@taskflow.dev"
Replace the name and email with your own. The quotes matter: put your name and your email inside them.
The command has four pieces. Understanding them saves you confusion when, in a few days, you need to change something:
git configadjusts how Git behaves on your machine; it acts on configuration, not on a specific repository.--globalis the scope. It means “apply this to every project on this machine, not just the folder I’m in right now.”user.nameanduser.emailare the specific properties you’re configuring. Notice the dot:user.name, notusername."Alex Ramos"and"alex@taskflow.dev"are the values you assign to those properties.
It’s always the same shape: git config --global <property> "<value>". Change the property, change what you’re adjusting.
Why does Git need your name? Good question. The short answer is: because every commit (every snapshot of the project you save) is signed. You’ll understand the long answer once you’ve spent a week working with Git, look back, and see your name on every change. That history is your quiet résumé.
Your first repository: init, add, commit
You have Git installed. Git knows who you are. It’s time to create your first repository and save your first change.
Create a new folder and go into it:
mkdir my-first-repo
cd my-first-repo
The first thing to do is tell Git that this folder is going to be a repository:
git initYou’ll see something like Initialized empty Git repository in /Users/your-username/my-first-repo/.git/. That means Git created a hidden folder called .git inside your project. Everything lives in there: the history, the repository configuration, the pointers. You never have to touch that folder. Git handles it for you.
Right above that you might also see a notice starting with hint: about the default branch name (master). It’s just informational, not an error: that’s branches, which we cover in another post. Ignore it for now.
Now create a file. Whatever you want. An index.html, a README.md, a hello.py. For example:
echo "# My first Git project" > README.mdIf you run git status, Git tells you the truth: you have a new file that Git isn’t tracking. It calls this untracked:
git status
# Untracked files:
#   README.md
Your terminal will show a few more lines (something like On branch master, No commits yet, and a hint about how to use git add). Don’t worry about those: what matters here is that README.md shows up under untracked.
To tell Git “I want you to remember this file,” you use git add:
git add README.mdWhat just happened matters. git add doesn’t save the file. It moves it to an intermediate zone called the staging area (or index). It’s like saying “this file is going into the next snapshot.” You can add several files with git add and none of them are saved yet. You’re only selecting them.
If you run git status again, you’ll see that README.md has moved from “untracked” to “changes to be committed.”
The last step is saving the snapshot:
git commit -m "First commit: add README"git commit takes everything in the staging area and turns it into a commit: a complete snapshot of how the project stands at this exact moment. The -m flag lets you write the commit message directly on the same line. The message is for your future self: three weeks from now, when you don’t remember what you did, that message will tell you.
And that’s it: you’ve just created your first Git repository and your first commit. Three commands: init, add, commit. If you’re curious to understand exactly what a commit is under the hood (why it’s a snapshot and not a patch, and what it actually stores), I break it down in what a commit in Git actually is.
Before you move on, make the commit yourself. Not by reading it: by doing it. Here’s a simulation with Marina, a developer who just came out of bootcamp just like you, so you can go through init, add, and commit without touching your terminal yet:
Loading exercise...
Made your first commit up there? Then this is starting to click.
The three zones: working directory, staging area, and repository
There’s a concept that, if you understand it now, saves you a hundred headaches later. Git doesn’t see your folder as one flat thing. It sees it as three distinct zones:
-
Working directory. This is your regular folder, the one you see in the file explorer. Here you create, edit, and delete files. Git watches this zone and tells you what’s changed, but it doesn’t save anything until you ask it to.
-
Staging area. This is the prep zone. When you run
git add <file>, you move that file from the working directory to the staging area. It’s like placing it on a tray labeled “this goes in the next snapshot.” You can add and remove files from this tray as many times as you want before taking the snapshot. -
Repository. This is where commits live. When you run
git commit, everything that was in the staging area becomes a complete snapshot that Git stores forever in the repository. Each snapshot has a unique identifier and an arrow pointing to the previous one.
The flow is always the same: you edit in the working directory, you select with git add what you want to save into the staging area, and you save the snapshot with git commit into the repository.
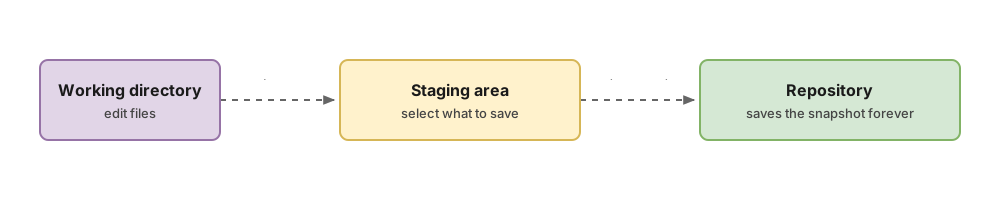
This three-zone model is what lets you decide what goes into each commit. You don’t have to save everything you’ve touched. You can touch five files and decide that only two go into this commit because the other three are part of something else. That’s called selective staging, and it’s one of the things that really separates an advanced user.
First-steps checklist
- Git is installed and
git --versionreturns a version number - You’ve configured
git config --global user.namewith your name - You’ve configured
git config --global user.emailwith your email - You’ve created a repository with
git initin a test folder - You’ve made your first
git addandgit commitwith a message your future self can understand - You understand the difference between working directory, staging area, and repository
So, now what?
If you’ve made it this far and made your first commit, you’re no longer someone who’s “heard of Git.” You’re someone who’s used it. You have Git installed, it knows who you are, and you’ve saved your first snapshot of the project. That’s the 20% that gets you 80% of your day-to-day.
Look at the checklist above: those are things you do on your own, in your own folder, with nobody else involved. The real leap happens when you stop working alone. What happens when two of you are touching the same project? How do you push your work to GitHub without stepping on your teammate’s? What do you do when two changes collide? That’s where branches, push/pull, and merges come in, and all of that builds on the three zones you just learned.
That second leap, from working alone to moving comfortably in a team repo, is exactly what we walk through, simulation by simulation and without the cold sweats, in Git: from zero to professional. Short, visual, and built so you come out knowing how to direct Git instead of memorizing commands. If this article clicked for you, the course is the natural next step.
Frequently Asked Questions
Are Git and GitHub the same thing?
No. Git is the version control tool that lives on your computer. GitHub is a web platform where you can store a copy of your repository to share it with others or to have an external backup. You can use Git without GitHub perfectly fine. In fact, Git worked for years before GitHub existed. The confusion comes from GitHub being so popular that a lot of people learn both at the same time and mix them up. Think of Git as the car and GitHub as the garage where you park it. The car works without a garage. If this confusion has ever bitten you, I clear it up fully in Git vs GitHub: what sets them apart.
How often should I commit?
Every time you finish a logical unit of work. Not every hour. Not every line. When you’ve made a change that stands on its own: “add login form validation,” “fix header color,” “extract date formatting into a helper function.” A commit should be one single thing. If the commit message needs the word “and,” it should probably be two commits.
What’s the difference between git add . and git add <file>?
git add . adds everything that’s changed in the current folder and its subfolders to the staging area. It’s fast but imprecise: you’re putting everything you’ve touched into the snapshot, including files you might not have wanted to save yet. git add <file> lets you choose file by file what goes into the next commit. You use the first one when you know exactly what you touched and want it all to go together. You use the second when you’ve touched things from different features and want to split them into different commits. With practice, the second one becomes your default.
Can I undo a commit?
Yes. Git has several tools for undoing things, from git restore for individual files to git reset for entire commits. But that’s a topic for another post. For now, hold onto this: almost nothing you do in Git is truly irreversible. There’s always a way back, even when you think you’ve broken everything.
Do I need internet to use Git?
No. Everything we’ve done in this post (init, add, commit, viewing history, undoing changes) works offline. You only need internet when you want to sync your work with a remote (GitHub, GitLab) via git push or git pull. Until then, Git lives entirely on your computer, and the complete history of the project sits right there inside the .git folder.
Related articles

What Is Version Control (and Why Git Won)
What version control is, what it's for, and why Git, the distributed system, won out over centralized ones. Explained from scratch for beginners.

What Is a Git Commit (and Why It's a Snapshot, Not a Patch)
A Git commit is a complete snapshot of your project at a single instant. Understand what it actually stores and why it lets you travel back in time.
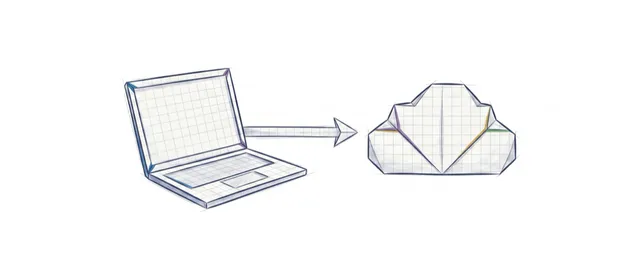
Git vs GitHub: Why They're Not the Same Thing
Git vs GitHub: Git versions your code locally, and GitHub hosts that repository online. I'll explain the difference with commented commands.