
git clone: How to Clone a GitHub Repository Step by Step
What git clone actually does: it copies the project, its history, and sets up origin. HTTPS vs SSH, clone vs init, and the most common errors.

You join a new team, someone sends you a GitHub link, and the first instruction of the day is “clone the repo.” It sounds like copying a few files, but there’s more to it: when you clone a repository with git clone you don’t just download today’s code, you download the entire project with its full history and a connection to the original already set up. Here’s exactly what it leaves on your computer and why that matters. It’s one of the first pieces of working as a team with Git and GitHub: before you can collaborate, you need the project copied onto your computer.
To follow along you just need Git installed on your computer. To clone a public repository over HTTPS, nothing else is required. Your GitHub account comes into play when you use SSH or want to send your changes with git push, which is exactly what happens once you join a team.
What does git clone actually do?
git clone copies an entire remote repository to your machine: the files, the full history of changes, and a connection already configured to the original repository [1]. It’s not a loose download of the latest version. It’s a functional replica of the project, ready to work with.
Let’s break it down, because there are two words here that maybe nobody has explained to you yet.
A remote is a copy of the project that lives on a server, in this case on GitHub. It’s the “official” version the whole team shares. When you and three teammates work on the same project, each of you has your own local copy, and all of them point to the same remote.
The history is every commit in the project. A commit is a saved snapshot of the code at a specific moment, with a message describing what changed. Cloning brings you all of those snapshots from day one, not just the latest one. That’s why you can see who touched what, when, and why, without having to ask anyone.
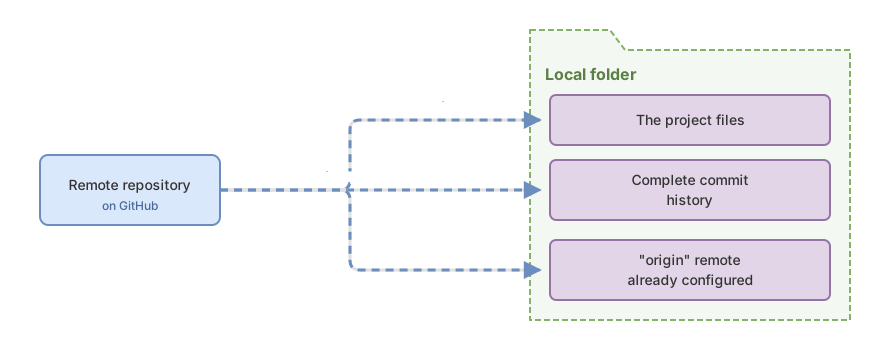
git clone leaves on your computer: not just the files, but also the full history and the origin connection, already set up.How do I clone a repository step by step?
Copy the repository URL from GitHub and run git clone followed by that URL. Git creates a folder, puts the project inside it, and sets up the remote connection, all in one step.
# Clone the repository into a new folder inside the current directory
git clone https://github.com/usuario/proyecto.git

# Enter the folder Git just created
cd proyecto
Where does the name proyecto come from? Git uses the last part of the URL (without the .git) to name the folder. If the repo is called proyecto.git, the folder is called proyecto. If you want a different name, add it at the end of the command:
# Clones the same repo but into a folder called mi-carpeta
git clone https://github.com/usuario/proyecto.git mi-carpeta
How do you check that the history came over in full, not just today’s files? With git log:
# Shows the commit history, one line per commit
git log --oneline
The output is a list of commits, from most recent to oldest, each one preceded by its short identifier:
a1b3c9d Add validation to the signup form
7f2e0a4 Fix total calculation in the cart
3c8d1b2 Initial commit
That odd-looking code at the start of each line (a1b3c9d) is the commit hash, its unique fingerprint. If you see several commits there, including one from months ago, that’s the proof: you have the entire history, not a single loose snapshot.
Before moving on, try it yourself: in this interactive exercise you clone a repository and see exactly what you end up with locally, without leaving the page.
Loading exercise...
HTTPS or SSH? Which one should I choose?
They’re two ways to connect to the same repository, and you can tell them apart at a glance by how the URL starts. GitHub offers you both when you click the “Code” button on the repo [2].
# HTTPS option: the URL starts with https://
git clone https://github.com/usuario/proyecto.git

# SSH option: the URL starts with git@ and has a colon before the path
git clone git@github.com:usuario/proyecto.git
Notice the difference in the SSH URL: after github.com there’s a colon (:), not a slash. It’s a classic mistake when typing it out by hand.
So what actually changes between the two? How you prove it’s really you.
| HTTPS | SSH | |
|---|---|---|
| Starts with | https:// | git@ |
| Prior setup | None, works instantly | Generate an SSH key and add it to GitHub, once |
| What it asks for | Username and a personal access token | Nothing, if the key is already set up |
If this is your first time and you just want to grab the repo today, go with HTTPS: no setup required. Once you start cloning and pushing daily, SSH saves you from typing credentials over and over, since you configure the key once and forget about it.
What is origin and why does it appear on its own?
origin is the name Git gives by default to the remote you just cloned from [1]. You don’t type it anywhere yourself: git clone creates it on its own. It’s a nickname so you don’t have to repeat the long URL every time you want to pull or push changes.
You can see it with git remote -v, from inside the project folder:
# Lists the configured remotes and their URLs
git remote -v
origin https://github.com/usuario/proyecto.git (fetch)
origin https://github.com/usuario/proyecto.git (push)You get two lines with the same name. (fetch) is the URL Git pulls other people’s changes from; (push) is the URL Git sends yours to. They’re usually the same, so you’ll see the URL repeated. From there on, whenever you type git pull or git push, Git knows “the remote” means origin without you having to say so. If you want to understand in depth how remotes work and add one yourself, check out the guide on connecting your repository to a remote on GitHub.
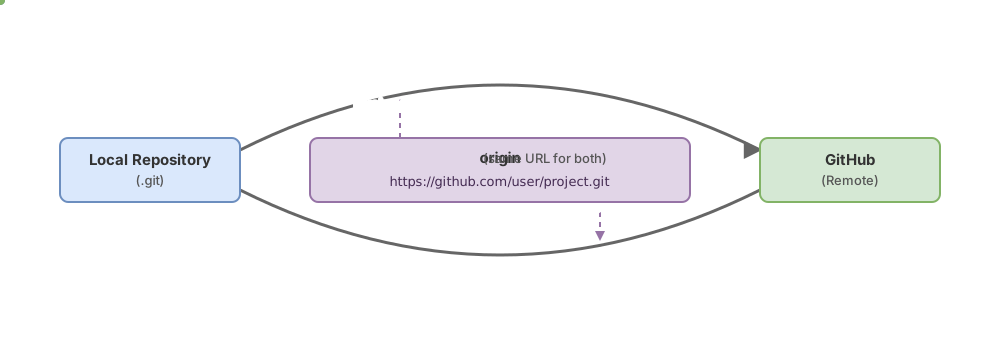
origin is a single URL with two directions: fetch pulls changes in, push sends them out.git clone vs git init: what’s the difference?
git clone brings in a project that already exists; git init starts a brand new one from scratch. That’s the whole difference, and it completely changes what you end up with.
When you run git init in a folder, Git turns it into an empty repository: no history and no remote configured [3].
# Creates a new, empty repository in the current folder
git init
After that, git log shows nothing (there are no commits yet) and git remote -v comes back empty (there’s no GitHub to point to). You start from zero: you make the first commit, and you connect the remote later, yourself.
git clone | git init | |
|---|---|---|
| What it’s for | Bringing in a repository that already exists | Starting a brand new project |
| Prior history | Yes, comes in full | No, you start empty |
origin remote | Configured automatically | None, you add it yourself later |
| Starting point | The project exactly as it is on GitHub | An empty folder |
| When to use it | You’re joining something already running | You’re creating something from nothing |
Rule of thumb: if someone hands you a link, you clone. If the project doesn’t exist on any server yet and you’re the one creating it, you run init. And there’s a third case that trips up a lot of people at first: cloning a project that isn’t yours in order to contribute. That mixes clone with a different operation, and we cover it in the difference between forking and cloning.
Common cloning errors (and what they mean)
fatal: repository '...' not found
This is the most common one, and it’s almost always one of two things. Either the URL has a typo (an extra letter, the wrong username), or the repository is private and your account doesn’t have access. For security reasons, Git doesn’t distinguish between “doesn’t exist” and “exists but isn’t for you.” Check the URL character by character, and if it’s correct, ask whoever manages it for access.
Permission denied (publickey)
This shows up when you clone over SSH but don’t have an SSH key configured on GitHub. It’s Git’s way of saying “I don’t know who you are.” The quick fix if you’re in a hurry: clone over HTTPS instead. The proper fix: generate an SSH key and add it to your GitHub account once.
Cloning inside another folder that’s already a repository
A silent mistake that confuses a lot of people. You’re inside the folder of a project you already cloned, you forget, and you clone another repo in there. Now you have a repository nested inside another one, and Git starts behaving strangely. Before cloning, check where you are with pwd and clone somewhere clean, like your projects folder.
Downloading the ZIP isn’t cloning
GitHub has a button to download the project as a ZIP, and it’s tempting. But that ZIP only includes the files from the current version: no history, no remote. You won’t be able to run git pull to bring in changes or git push to send them, because that folder isn’t even a Git repository. If you’re going to actually work on the project, clone it.
Check that you cloned correctly
- You’re inside the project folder (use
cdafter cloning) -
git log --onelineshows commits, not an empty-repository message -
git remote -vshowsoriginwith its URL on the fetch and push lines - The
originURL matches the repository you meant to clone - You haven’t cloned inside another folder that was already a repository
Cloning is the first real step into working with code, and branches, commits, pulls, and pushes all follow from there. If you want to practice the whole flow with guided exercises instead of just reading about it, the Git from Zero to Professional course walks you step by step from your first git clone to collaborating on a team without fear.
Sources
- Official git clone documentation (git-scm.com): default behavior, names the remote
origin, creates a tracking branch for each remote branch, and checks out only the default branch. - Cloning a repository (GitHub Docs): HTTPS and SSH URL formats and the steps to clone from the GitHub interface.
- Official git init documentation (git-scm.com):
git initcreates an empty repository, with no history and no remote configured.
Frequently Asked Questions
Does git clone bring me all the branches?
Yes. When you clone, Git downloads every branch from the remote repository and creates a tracking branch for each one [1]. What happens is it only leaves the default branch active (checked out), usually main. The rest are all there, ready to use: you can see them with git branch --remotes and switch to any of them whenever you need.
Can I switch from HTTPS to SSH after cloning?
Yes, and you don’t need to clone again. You change the origin remote’s URL with a single command:
# Changes the origin URL from HTTPS to SSH
git remote set-url origin git@github.com:usuario/proyecto.git
Then check it with git remote -v and you’ll see the new URL on the fetch and push lines.
Do I need to run git init after cloning?
No. git clone already initializes the repository internally, so the cloned folder is a fully-fledged Git repository from the very first second. Running git init on top of it doesn’t break anything, but it’s unnecessary. You only use init when you’re starting a project from scratch.
Where does the cloned repository get saved?
In a new folder inside the directory you were in when you ran the command. If you were in ~/proyectos and cloned proyecto.git, your repo ends up at ~/proyectos/proyecto. That’s why it’s a good idea to first move into your projects folder and check with pwd that you’re not already inside another repository.
Related articles
Working as a Team with Git and GitHub: Remotes, PRs, and Code Review
From a local commit to a shared repo: the distributed model, remotes, the push/pull/fetch cycle, Pull Requests, and code review, without stepping on anyone else's work.

git remote: Connect Your Local Repo to GitHub
A beginner's guide to connecting your local repo to GitHub with git remote: what origin is, how to do your first push, and what -u means.

Fork vs Clone in Git: When to Use Each One
A clone is a local copy; a fork lives in your GitHub account. When to use each one, and the flow for contributing to someone else's project.