
git remote: Connect Your Local Repo to GitHub
A beginner's guide to connecting your local repo to GitHub with git remote: what origin is, how to do your first push, and what -u means.

Your commits live on your laptop. If your disk dies, you lose them all, and your teammate can’t see any of the work you’ve done. Connecting your local repo to GitHub solves both problems at once, and it only takes three commands. Here’s what a remote is, what git remote conectar github actually does when you copy that line from a tutorial, and why a plain git push asks for --set-upstream the first time.
To follow this post you need to know how to use git init, git add, and git commit: a local repo with at least one commit made. If you already have that, you’ve done the hard part. Connecting it to GitHub is the first step of the team workflow with Git and GitHub, and the rest of this post breaks it down command by command.
What Is a Remote in Git?
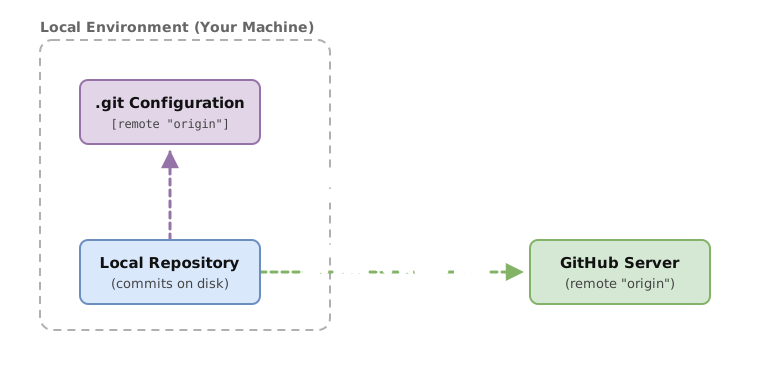
A remote is a copy of your repository that lives on a server, usually GitHub. Think of your local repo as the folder on your laptop where you work, and the remote as a shared backup on the internet that you and your team can push to and pull from.
When you run git init and start saving commits, all of that only exists on your machine. Git doesn’t talk to any server on its own. For your commits to leave your laptop, you have to tell Git which server to send them to, and that server is the remote.
GitHub isn’t the only thing that can host a remote. GitLab, Bitbucket, or a server of your own work too. But since GitHub is the most common starting point, it’s the one I use in the examples.
There are two possible directions here. Pushing your local repo to GitHub for the first time is what this post covers. If the repo already exists on GitHub and what you want is to bring it to your machine, that’s cloning a repository, the reverse path, and git clone sets up the remote for you automatically.
What Does git remote add origin Do?
git remote add origin <url> registers your remote’s address and gives it the short name origin. It doesn’t upload a single commit. It just makes a note in your local repo’s configuration: “when I say origin, I mean this URL.” This part trips up a lot of people, so hold onto it: adding the remote and pushing the code are two separate steps.
# Registers the GitHub remote with the short name "origin".
# Replace "ana" with your username and "proyecto" with your repo.
git remote add origin https://github.com/ana/proyecto.git
Why origin? It’s just a convention. Git doesn’t force you to name it that, but by custom the first remote (the place your repo came from or goes to) is called origin. You could call it github or home and it would work just the same. Almost every tutorial uses origin, and following the convention saves you surprises.
The URL can come in two formats, and GitHub shows you both under the green “Code” button on your repository.
| HTTPS | SSH | |
|---|---|---|
| Format | https://github.com/ana/proyecto.git | git@github.com:ana/proyecto.git |
| Authentication | username and a personal access token | an SSH key pair you set up once |
| When to use it | the fastest way to start your first repo | convenient long-term once you already have the keys set up |
If you’re just starting out, use HTTPS. It’s copy, paste the URL, and done. When you get tired of entering the token, set up SSH, but that’s another topic.
How Do I Check That It’s Properly Connected?
With git remote -v. That command lists the remotes you have configured and shows you the URL of each one, so you can confirm you haven’t made a mistake before trying to push anything.
git remote -v
# origin  https://github.com/ana/proyecto.git (fetch)
# origin  https://github.com/ana/proyecto.git (push)
Notice that two lines show up for origin: one marked (fetch) and another (push). Fetch is pulling changes from the remote, push is sending them. Git shows you both because, even though they almost always point to the same place, they can be configured separately. If you see your URL on both lines and it’s spelled correctly, the remote is properly connected.
If git remote -v doesn’t return anything, that means the add never actually ran, or you ran it in a different folder. And if you see a URL with a typo, don’t worry, it’s fixable without deleting anything, we’ll cover that in the common errors section.
What Does git push -u origin main Do?
git push -u origin main does two things: it pushes your main branch to the origin remote and, thanks to the -u, saves the fact that your local main is paired with GitHub’s main. This is the first push, the one that actually sends your commits out to the internet.
# Pushes the main branch to the origin remote and saves the association (-u).
git push -u origin main
The -u is short for --set-upstream. Without it, every time you wanted to push you’d have to type out the full git push origin main, repeating the remote and the branch. With -u set just once, Git notes in its configuration that your main tracks origin’s main, and from then on a plain git push or git pull is enough: Git already knows where to go. That’s the upstream branch: the association between your local branch and the remote’s.
And why main and not something else? It’s the name of your main branch. GitHub has been creating repos with main as the default for years. If your branch is named something else, swap it into the command for the real name (you can check it with git branch).
You only need -u on the first push of each branch. Once the association is saved, you don’t have to repeat it. If you ever create a new branch and push it for the first time, you’ll use -u again for that specific branch.
Before moving on, try ordering the steps of connecting a local repo to GitHub yourself in this interactive exercise:
Loading exercise...
What’s the Difference Between origin and origin/main?
origin is the whole remote (the server); origin/main is a specific branch within that remote, as seen from your machine. They look similar when you read them, but they’re different things, and understanding the difference saves you a lot of confusion later on.
origin is the short name for the server’s URL. When you type git push origin main, the origin there is the destination: the GitHub you’re pushing to.
origin/main is something else: it’s the remote-tracking branch. It’s the snapshot Git keeps on your machine of where the remote’s main was the last time you synced. It doesn’t update on its own. If your teammate pushes a commit to GitHub, your origin/main doesn’t find out until you pull changes. That’s why your origin/main is sometimes “behind” what’s actually on the server.
origin | origin/main | |
|---|---|---|
| What it is | the remote: the short name for the server’s URL | the remote-tracking branch: your local snapshot of the remote’s main |
| When it changes | when you edit the URL with git remote set-url | when you sync with fetch, pull, or push |
| Example | https://github.com/ana/proyecto.git | commit a1b2c3d, the last known position of main on GitHub |
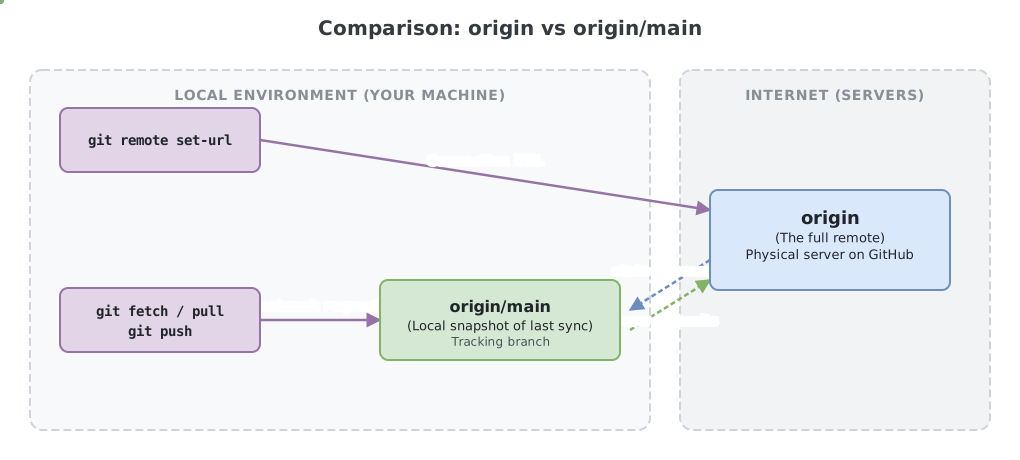
Updating that snapshot is exactly what git fetch and git pull do: they bring the real position from the server and bring your origin/main up to date. Once you have the remote connected, syncing is the natural next step.
Common Errors When Connecting the Remote
error: remote origin already exists.
This is the most common one, and it shows up when you try git remote add origin ... but you already had an origin set (sometimes because a tutorial had you set it earlier and you forgot). Git’s exact message is:
git remote add origin https://github.com/ana/proyecto.git
# error: remote origin already exists.
Don’t delete the repo or start from scratch. If the old URL is wrong, change it with set-url. If you’d rather remove the remote and add it again, git remote remove origin cleans it out.
# Option A: change the URL of the existing origin.
git remote set-url origin https://github.com/ana/proyecto.git

# Option B: remove it and add it again.
git remote remove origin
git remote add origin https://github.com/ana/proyecto.git
A Typo in the Username or Repo in the URL
Here Git doesn’t complain when you run add, because it doesn’t check that the URL exists until you try to push. You type git remote add origin with a typo in your username, git remote -v happily shows you the wrong URL, and only when you push does authentication fail or does it tell you the repository doesn’t exist. That’s why it’s worth checking the output of git remote -v before your first push. The fix is the same as above: git remote set-url origin <correct-url>.
Updates were rejected Because of Diverging History
If when you push you see something like ! [rejected] followed by “Updates were rejected because the remote contains work that you do not have locally” (git shows it across several lines, with a hint: or two included), it means there are commits on GitHub that you don’t have locally. This usually happens when you created the repo on GitHub with a README or a .gitignore checked on the web: the remote started out with a commit your laptop doesn’t know about.
A lot of people’s reaction is to force the push to “win,” and that’s the real mistake. Forcing overwrites whatever work was already on the server, and if it was your teammate’s, you lose it. The right move is to first pull what’s on the remote with git pull, resolve conflicts if needed, and push again. In the rare case you ever do need to force it, --force-with-lease is safer than --force because it aborts if the remote changed underneath you, but for connecting your repo for the first time you’ll almost never need to force anything.
Forgetting the -u on the First Push
It doesn’t break anything, it’s just inconvenient. If you run git push origin main without -u, it still pushes, but it doesn’t save the association, so next time a plain git push will ask you to specify the remote and branch again. It’s fixed by running git push -u origin main once (or git branch --set-upstream-to=origin/main) to record the upstream branch.
Connection Checklist
- You have a local repo with at least one commit (
git logshows something) - You copied the correct URL from the “Code” button on your repository on GitHub
- You ran
git remote add origin <url>without errors -
git remote -vshows your URL on both the(fetch)and(push)lines - Your first push was
git push -u origin main, with the-uincluded - After the push, you can see your files on the repo’s page on GitHub
Connecting the remote is the first step toward working with Git for real. If you want to practice the whole flow (branches, push, pull, resolving conflicts) with guided exercises instead of scattered tutorials, it’s laid out step by step in the Git from Zero to Professional course.
Sources
- git remote, official Git documentation: the behavior of
add,-v,set-url, andremove, and the exit status when adding a remote that already exists. - git push, official Git documentation: what
-u/--set-upstreamdoes and the format of the remote’s rejection messages.
Frequently Asked Questions
Can I Have More Than One Remote?
Yes. A repo can have several remotes with different names, for example origin pointing to your GitHub and upstream pointing to the original repository you forked from. You add each one with git remote add <name> <url> and see all of them with git remote -v. In your first project you’ll almost always have just origin, but it’s useful to know the limit isn’t one.
What If I Got the URL Wrong When Connecting the Remote?
Nothing serious happens, and you don’t need to delete the repo. You change the URL with git remote set-url origin <correct-url> and check the result with git remote -v. Git doesn’t validate the URL when you add it, so a typo only shows up when you try to push; that’s why it’s worth checking git remote -v before your first push.
Do I Have to Use -u Every Time?
No. -u only needs to be set the first time you push a branch, because its job is to save the association between your local branch and the remote’s. Once that’s done, a plain git push and git pull already know where to go. If you create a new branch later, you use -u again the first time you push that specific branch.
Is origin Required as the Remote’s Name?
No, it’s a convention. You can name your remote whatever you want with git remote add <name> <url>. origin is used because almost everyone does it and tutorials assume it, so following the custom saves you from having to translate every command to your made-up name.
Related articles
Working as a Team with Git and GitHub: Remotes, PRs, and Code Review
From a local commit to a shared repo: the distributed model, remotes, the push/pull/fetch cycle, Pull Requests, and code review, without stepping on anyone else's work.
git clone: How to Clone a GitHub Repository Step by Step
What git clone actually does: it copies the project, its history, and sets up origin. HTTPS vs SSH, clone vs init, and the most common errors.
git pull vs git fetch: the difference that matters
git fetch downloads changes from the remote without touching your work; git pull downloads and integrates them. When to use each one and why.