
git log: how to view and navigate your commit history
Learn to read your commit history with git log: the anatomy of a commit, the --oneline view, what HEAD is, and how to exit the pager without panicking.

You’ve just made your first commits. Excited, you type git log to see what you’ve saved, and the terminal dumps a full screen of text that doesn’t fit, with a strange symbol at the bottom, and suddenly it stops responding to anything. Don’t worry: you haven’t broken anything. That wall of text IS your history, and here you’ll learn to read it, move through it, and exit that screen without forcing the terminal closed.
To follow this post you only need to know one thing: what a commit is. A commit is a saved snapshot of your project at a specific moment, with a message explaining what you changed. If you’ve run git add and git commit at least once, you already have history. And git log is the command to view it. If all of this still sounds like gibberish, start with the guide on what Git is and your first steps and come back after.
What is the commit history, and why does git log show it to you?
The history is the list of every commit you’ve made in the repository, ordered from most recent to oldest. Every time you run git commit, Git adds a new snapshot on top of the previous one. Over time this forms a chain: commit after commit, each one pointing to the one that came before it.
Think of the history as a chat’s message log. Each message has a timestamp, a sender, and text. A commit is the same: it has a date, an author, and a message. git log is the window that shows you that entire conversation, from the last message backward.
The first thing worth remembering, especially if you’re just starting out and everything feels a bit intimidating: git log is read-only. It only displays. It doesn’t delete commits, doesn’t change files, doesn’t touch anything in your project. You can run it a thousand times in a row and your code will stay exactly the same.
How to read the output of git log
The most basic way is to just type the command on its own:
# Shows the complete history, from the most recent commit to the oldest
git log
And this is what Git returns for each commit:
commit 7b2e0d4f1a9c3e5b8d2f0a4c6e1b9d3a5f7c2e0b
Author: Sofía Ramírez <sofia@ejemplo.com>
Date:   Wed Aug 20 10:32:18 2026 +0200

    Add validation to the registration form
Let’s go line by line, because each one tells you something:
commit 7b2e0d4...is the commit’s hash: a unique identifier, kind of like a license plate. It’s 40 hexadecimal characters (digits 0 to 9 and letters a to f). No two commits ever share the same hash.Authoris who made the commit: the name and email you configured in Git.Dateis the exact date and time it was saved.- The indented line below is your commit message, the text you wrote to explain what you changed.
If you have a lot of commits, Git doesn’t dump them all on you at once. It opens them in a pager, a viewer called less, so you can read through them a bit at a time without them scrolling off the top. This is the trap that scares almost everyone the first time.
When you see that screen full of text and a : (colon) shows up at the bottom, or something like (END), the terminal isn’t frozen. It’s waiting for you to tell it what to do. Scroll down with the down arrow or the space bar, scroll up with the up arrow, and when you want to exit press the q key (for quit). That returns you to the normal terminal. Don’t mash Ctrl+C in a panic or close the window: just press q.
Pager panic is by far the number one stumbling block for beginners. Remember it this way: if you ever get stuck on a text screen after a Git command, try q first.
git log —oneline: your history in one line per commit
git log --oneline summarizes each commit in a single line: the short hash and the message, nothing else. It’s the view you’ll use almost all the time, because the long format, with author and date spread across three lines, takes up a lot of space when all you want is a quick snapshot of what you’ve done.
# One line per commit: abbreviated hash + message
git log --oneline
7b2e0d4 Add validation to the registration form
a3f9c21 Create the registration page
c58d17e Set up the initial projectMuch more readable, right? You can see your whole history at a glance. Notice the hash: here it’s short (7b2e0d4), just the first few characters. It’s the same identifier that had 40 characters before, but Git shows you an abbreviated version because the first 7 characters are usually enough to tell one commit from another.
You don’t need to memorize that short hash or carefully copy it out by hand. When some future command asks you for a specific commit, you select it from here and copy-paste it. It’s a reference for the machine, not a number you need to learn.
What is HEAD, and why does it show up in the log?
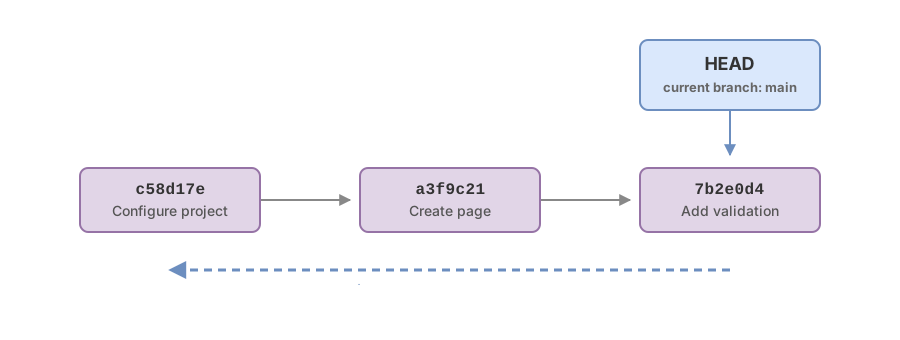
HEAD is the pointer to your current position: the commit you’re working on right now. When you make a new commit, it’s saved right on top of wherever HEAD points, and HEAD moves forward to point at that newly created commit.
The analogy that works for me is a bookmark. HEAD is the bookmark stuck in your project: it marks which page you’re on. It’s almost always on the last commit of your branch, which is where you’re writing. When you run git log you’ll see it show up right at the top, in parentheses:
7b2e0d4 (HEAD -> main) Add validation to the registration form
a3f9c21 Create the registration page
c58d17e Set up the initial project
That HEAD -> main means: you’re on commit 7b2e0d4, and that commit is the tip of your main branch. In other words, HEAD tells you where you are, and main tells you the name of the branch you’re on. For now it’s enough to think of HEAD as “this is where I am”.
Viewing branches with git log —oneline —graph
git log --oneline --graph draws the shape of your history as an ASCII tree of lines to the left of the commits. While you’re working on a single branch, the history is a straight column and this command doesn’t add much. Its moment comes when branches split off and merge back together.
For this example, picture a slightly busier project than the last one, one where a branch was opened for login and later merged back in:
# Adds a tree of branches and merges to the left of the log
git log --oneline --graph
* 9d1a4f0 (HEAD -> main) Merge branch login
|\
| * 4e7b2c9 Add login button
| * a3f9c21 Create the registration page
|/
* c58d17e Set up the initial projectThe asterisks are the commits. The lines with |, \, and / show how a branch split off from the main trunk to add the login and then merged back in. At first this can look confusing, and that’s fine, you can leave it aside for now. Save it for the day your team works with multiple branches and you want to understand at a glance what merged with what.
Filtering history once you have a lot of commits
As the project grows, looking at the whole history becomes unwieldy. Git lets you trim it down, and all these options combine with --oneline without any issue.
To see just the most recent commits, use -n followed by a number (there’s also the short attached form, -3):
# Only the 3 most recent commits
git log -n 3 --oneline
To see only one person’s commits, use --author with part of their name or email:
# Only the commits whose author matches "sofia"
git log --author="sofia" --oneline
And to see only the commits that touched a specific file, put the file name after a double dash (--). That -- is a separator that tells Git “what comes next is a file, not an option”, and it keeps Git from getting confused if the file happens to share a name with a branch:
# Only the commits that modified that file
git log --oneline -- src/registro.js
You don’t have to memorize these filters today. It’s enough to know they exist for the day you find yourself wondering, “when did I touch this file?“
git log vs —oneline vs —graph: which to use and when
| Command | What it shows | When to use it |
|---|---|---|
git log | Full detail: long hash, author, date, and message, one block per commit | When you need the complete data for a commit: who and when |
git log --oneline | One line per commit (short hash + message) | Everyday use. For a quick glance at what you’ve done |
git log --oneline --graph | The same as —oneline plus a branch tree on the left | When there are several branches and you want to see how they split and merge |
If I had to pick just one, it would be git log --oneline. It’s the one I open without thinking every time I want to get my bearings on a project.

Now it’s your turn. Instead of just reading about it, try it: here’s a sample history to practice the commands you just learned.
Loading exercise...
Common mistakes when starting out with git log
Thinking the terminal has frozen
It’s the classic scare. You type git log, a wall of text appears, the terminal stops responding to your keystrokes, and panic sets in. It’s not frozen: it’s the less pager waiting for input. Press q and you’re back to normal. This one key saves you from force-closing the terminal fifty times.
Thinking git log changes something
Some Git commands feel intimidating because they modify your project. git log isn’t one of them. It’s read-only from start to finish: you can run it, filter it, and combine options as many times as you like without your code or your history budging an inch.
Trying to memorize the short hash
The hash is a license plate for the machine, not a number for your head. Nobody memorizes 7b2e0d4. When you need it, you copy it from the log and paste it wherever it’s needed.
Expecting to see which lines changed
It’s worth being clear on the boundary here. git log tells you WHICH commits exist and what message they carry, but it doesn’t show you the lines of code that changed inside each one. To see the content of those changes, line by line, the command is git diff, and I cover it in detail in the guide on how to view changes with git diff.
From reading history to moving through it
With git log you can already answer “what have I done so far?”. That’s the first superpower Git gives you: your project’s memory is always there, ordered and queryable. Its natural companion is git status, which instead of the past shows you the present (what you still have pending to save right now); I explain it in understanding the output of git status.
From here, some paths open up that are worth knowing about. With the hashes you see in the log you can travel back to an old commit to inspect how the project looked at that moment, and you can also ask Git to show you exactly what changed between two points in history. But that means looking at the content of the changes, not just the list of them, and there are specific commands for that which deserve their own space.
For now, hold on to the essentials: you type git log --oneline, you see your history at a glance, and you exit with q. With that, you won’t get stuck on that green screen again.
If you want to really get comfortable with these commands, practicing them on real repositories instead of just reading about them, the course Git from Zero to Professional walks you step by step from your first commit to navigating history with confidence.
Frequently Asked Questions
How do I exit git log when the screen fills up and stops responding?
Press the q key. When the history doesn’t fit on screen, git log opens it in a pager called less, which waits for you to navigate with the arrow keys or the space bar. The terminal isn’t frozen: it’s just waiting. The q key (for quit) closes the viewer and returns you to the normal terminal.
Does git log show the changes in each line of code?
No. git log shows you the list of commits with their hash, author, date, and message, but not the specific content of what changed inside each one. To see which lines were added or removed you need git diff, which is a different command built exactly for that.
What’s the difference between the long hash and the short hash?
They’re the same identifier, just at a different length. The full hash has 40 hexadecimal characters and is what Git stores internally. The short hash is the first 7 characters, which Git shows in git log --oneline because they’re almost always enough to tell one commit from another. You can use the short version in most commands without any issue.
Can I see only my own commits?
Yes, with the --author option followed by part of your name or email, for example git log --author="sofia" --oneline. Git filters the history and shows you only the commits whose author matches that text. It’s very handy in a shared project where several people’s commits are mixed together.
What exactly is HEAD?
HEAD is a pointer that marks which commit you’re currently on, the commit you’re working from. Think of it as your project’s bookmark: it usually points to the last commit on your current branch, and when you make a new commit, HEAD moves forward to point at it. In the output of git log it shows up right at the top, as HEAD -> main.
Related articles
What Is a Git Commit (and Why It's a Snapshot, Not a Patch)
A Git commit is a complete snapshot of your project at a single instant. Understand what it actually stores and why it lets you travel back in time.
Commit Messages: Best Practices with Examples
Learn to write useful commit messages: imperative-mood subject lines, the 50/72 rule, the why over the what, and Conventional Commits, with examples.
How to Go Back to a Previous Commit in Git Without Losing Work
How to go back to a previous commit in Git based on what you actually want to do: inspect it with checkout, move your branch with reset, or undo it with revert, without losing work.