
git stash: save changes without committing
Learn to use git stash to save half-finished changes, switch branches without losing work, and get it back later with pop and apply.

You’re halfway through a task. You’ve spent twenty minutes writing a login form and your teammate messages you: “can you check an urgent bug on main?” You run git switch main to change branches and Git stops you cold with your local changes would be overwritten. You don’t want to commit half-finished work, but you need to switch branches right now. This is where git stash comes in: it saves your uncommitted changes, leaves your working directory clean, and gives you your work back when you return.
To follow this post you need to know add, commit, and switching branches with git switch. Not much else. If you want the full picture of managing changes in Git, check out the general guide to undoing and moving changes.
What is git stash and when do you need it?
git stash is a temporary drawer for work that’s still in progress. It takes all your uncommitted changes on a branch, sets them aside, and leaves your working directory looking like it did at the last commit. The code isn’t lost: it’s saved, ready for you to bring back whenever you want.
The typical scene is the one at the start. You’re in the middle of a task and something more urgent comes up on another branch. Git won’t let you jump branches if the changes you’re carrying would overwrite files on the destination branch. You have two bad options and one good one. The quick bad one is committing half-finished work, which clutters the history with a half-baked “wip” you’ll have to undo later. The slow bad one is copying the files by hand into another folder. The good one is git stash.
# You're halfway through a task on feature/login
$ git status
On branch feature/login
Changes not staged for commit:
  modified:   src/login.ts

# You try to switch to main to check the urgent bug
$ git switch main
error: Your local changes to the following files would be overwritten by checkout:
	src/login.ts
Please commit your changes or stash them before you switch branches.
Notice the last line of the error: Git itself suggests stash them. Use case number one is exactly that: switching branches with unsaved changes. If branches are still a bit fuzzy for you, the post on Git branches: create, switch, and merge will help before you keep going.
How do I save my changes with git stash?
You save changes with plain git stash, or better with git stash push -m "message" to give it a name. Both do the same thing: they set aside what you’ve modified and leave the tree clean. The difference is that -m adds a label so you can recognize it later.
# Saves your half-finished work and gives it a name
$ git stash push -m "wip login form"
Saved working directory and index state On feature/login: wip login form

# Now the directory is clean, as it was at the last commit
$ git status
On branch feature/login
nothing to commit, working tree clean
With the tree clean, you can now switch branches without Git complaining. You check the bug on main, do whatever you need to do, and come back to your branch.
# With the tree clean, you switch branches with no issues
$ git switch main

# ...you check the urgent bug, fix whatever needs fixing...

# And when you're done, you go back to your original branch
$ git switch feature/login
One important thing: git stash saves both what you have in the staging area (what you’d already run git add on) and what’s only modified but not staged. It restores both states. What it doesn’t save by default are new files Git doesn’t know about yet, but we’ll get to that below because it’s the most common gotcha.
How do I get back what I saved? pop vs apply
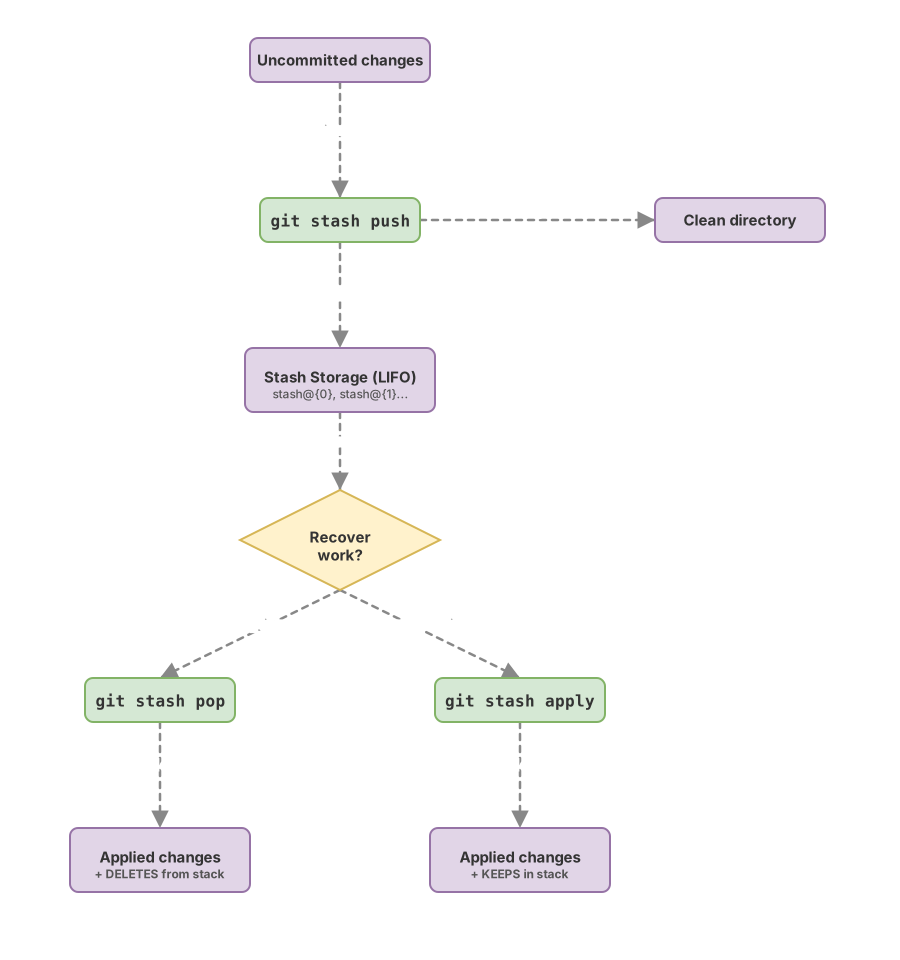
To get your work back you have two commands, and the difference between them is what trips up most people. git stash pop applies the last stash and deletes it from the list. git stash apply applies the same state but leaves the stash saved.
# Restores what you saved last AND deletes it from the list
$ git stash pop
On branch feature/login
Changes not staged for commit:
  modified:   src/login.ts
Dropped refs/stash@{0} (3f2a9c1d8b4e5f6a7c9d0e1f2a3b4c5d6e7f8a9b)
pop is the one you’ll use almost always: you get your work back and clean up the stash in one step. Use apply when you want to apply the same work in more than one place, for example testing the same changes on two different branches, since that way the stash stays available to apply again.
Here’s a detail worth knowing before it bites you: if a merge conflict shows up while doing pop, Git does not delete the stash. It stays in the list so you don’t lose anything while you resolve the conflict by hand. Afterward you’ll have to delete it yourself with git stash drop.
How do I see everything I’ve saved?
git stash list shows every stash you have, from most recent to oldest. Each one has an identifier with the format stash@{n}, where stash@{0} is always the last one you saved.
$ git stash list
stash@{0}: On feature/login: wip login form
stash@{1}: WIP on main: 9cc0589 Update README
This is where you see why -m pays off. The first one has a name you understand at a glance. The second is the automatic message Git puts there when you save without a label, with the commit hash and its title. When you have three or four stashes, the first one is gold.
If you want to restore one that isn’t the last one, pass its identifier to the command:
# Applies a specific stash (not the last one) without deleting it
$ git stash apply stash@{1}

# Once you no longer need it, you delete it yourself
$ git stash drop stash@{1}
Dropped stash@{1} (a1b2c3d4e5f6a7b8c9d0e1f2a3b4c5d6e7f8a9b0)
Here’s a quick view of what each command does and whether it touches the stash list:
| Command | What it does | Does it delete the stash? |
|---|---|---|
git stash apply | Applies the saved changes onto your current directory | No, keeps it in the list |
git stash pop | Applies the changes and deletes that stash from the list | Yes, unless there’s a conflict |
git stash list | Shows all saved stashes | No, read only |
git stash drop stash@{n} | Deletes a specific stash without applying it | Yes |
The untracked files trap
An untracked file is a new file you’ve created but never ran git add on. Git knows it exists, but it doesn’t track it yet. And here’s the hidden trap of git stash: by default it does not save those files[1].
Imagine that besides modifying login.ts you also created a new login.test.ts that you hadn’t added yet. If you run plain git stash, login.ts gets saved and disappears from the directory, but login.test.ts stays right there, in plain sight, unsaved. The first time this happens it’s alarming, because it looks like the stash “left something behind.”
The fix is the -u flag, short for --include-untracked:
# -u also includes new untracked files
$ git stash push -u -m "wip login with new tests"
Saved working directory and index state On feature/login: wip login with new tests
Simple rule of thumb: if you’ve created new files and want to set them aside too, use -u. If you’ve only touched files Git already tracked, plain git stash works fine.
You now have all the pieces: saving, switching branches, and restoring. Before we go over common mistakes, try the full flow with your own hands in this interactive exercise:
Loading exercise...
Common mistakes with stash
Expecting the stash to save your new files
This is the one we just covered and the one that causes the most surprises. You save with git stash, switch branches, come back, run pop… and that new component you’d started wasn’t in the stash because you never ran git add on it. It isn’t lost, it’s still in your directory, but it didn’t travel with you. When in doubt, use git stash push -u.
Piling up anonymous stashes until you’re lost
If you always save with plain git stash, no message, you end up with a list of identical WIP on ... entries and no idea which is which. Get in the habit of using git stash push -m "something descriptive" from the start. Future-you, two days from now, will thank you when you open git stash list and read “wip login form” instead of identical lines.
Using pop when you meant apply
If you’re going to apply the same stash in more than one place, pop deletes it the first time and you’re left without it. And if pop gives you a conflict and you resolve it badly, you can end up in a mess that’s hard to recover from. When you’re not sure, use git stash apply, check that everything looks right, and only then delete the stash with drop.
Treating the stash as long-term storage
The stash is a temporary drawer for moving from one task to another, not a place to leave work for weeks. The longer it sits there, the more the branch underneath changes, and the more likely you are to hit conflicts when you restore it. If something needs to last, put it on a branch or in a commit. And if what you’re looking for is undoing changes instead of setting them aside, that’s a different topic: it’s covered in the post on the differences between reset, revert, and restore.
Quick git stash checklist
- Save with
git stash push -m "message"so you can recognize it later - Use
-uwhen you have new untracked files you also want to set aside - Check the state with
git status(clean) before switching branches - Restore with
git stash popfor the normal case (restore and delete) - Use
git stash applywhen you want to keep the stash after applying it - Check
git stash listso you don’t pile up forgotten stashes - Don’t leave important work in the stash for days: use a branch or a commit for that
Practice the Git flow in a guided course
git stash clicks when you use it with your own hands, not just by reading about it. In the Git from Zero to Professional course you practice stash, branches, commits, and the rest of the daily workflow with interactive exercises, without fear of breaking anything in a real repository.
If you’d rather go at your own pace, sign up below and I’ll let you know when I publish more Git guides like this one.
Sources
- Official git stash documentation (git-scm.com): default behavior, the
-u/--include-untrackedoptions, and the difference betweenpop,apply,list, anddrop.
Frequently Asked Questions
Does git stash delete my changes?
No. git stash sets your changes aside and cleans the directory, but it saves them so you can restore them with git stash pop or git stash apply. There are commands that do delete a stash: git stash drop (or git stash clear, which deletes all of them) removes it without applying it, and git stash pop also deletes it, but only after applying it successfully (if there’s a conflict, it doesn’t delete it).
Is the stash shared when I push?
No. The stash is local to your repository and git push doesn’t upload it anywhere. Only commits get transferred, so if you need to share half-finished work with someone, you have to commit it on a branch and push that branch.
Can I have several stashes at once?
Yes, you can have as many as you want. Each new git stash stacks on top, and git stash list shows them numbered as stash@{0} (the most recent), stash@{1}, and so on. That’s why it’s worth naming them with -m, so you don’t get lost among several.
What happens to the stash if I switch branches?
Nothing, the stash isn’t tied to the branch where you created it: you can save on one, switch to another, and run git stash pop there to bring those changes with you without going through a commit.
How do I delete a stash I no longer need?
With git stash drop stash@{n}, using the identifier you see in git stash list. If you want to empty the whole drawer at once, git stash clear deletes all of them. Careful, a deleted stash is hard to recover, so make sure you no longer need it before doing that.
Related articles
How to Undo Changes in Git: The Guide to Never Losing Your Work
A decision guide for undoing changes in Git: which command to use for each situation (restore, reset, revert, stash) and why almost nothing is ever truly lost.
git reset vs revert vs restore: which one to use and when
The differences between git reset, revert, and restore: which area of Git each one touches, the three reset modes, and which one to use without breaking shared history.
Git Branches: Create, Merge, and Resolve Conflicts Without Panic
What a Git branch really is, how to create one, merge it with git merge, and resolve a conflict step by step. Plus merge vs. rebase without fear.