
How to Install Git on macOS (With and Without Homebrew)
Install Git on your Mac two ways: with Homebrew or with the Xcode Command Line Tools. Check the version and avoid the PATH problem on Apple Silicon.

You open Terminal on your new Mac, type git --version expecting a number, and instead you get a strange window asking you to install some “command line developer tools.” You haven’t broken anything. It’s macOS telling you something important: here, Git doesn’t come as an app you install once and you’re done, and you have to decide where to get it from. I’ll walk you through the two clean ways to get it working today, what each command does, and which one suits you.
To follow this guide you only need to know how to open Terminal: the macOS app where you type text commands instead of clicking. You’ll find it in Applications, inside Utilities, or by pressing Cmd + Space and typing “Terminal.” If you’re still not sure what Git is or why you’d want it, before installing anything I’d recommend reading what Git is and why you’ll use it, which is the bigger map this guide is just one step of.
Do I Already Have Git on My Mac?
Probably, sort of. The way to find out is to ask Terminal:
# Muestra la versión de Git que tu Mac ejecuta ahora mismo.
# Si no hay ninguna, macOS te ofrece instalar las herramientas.
git --version
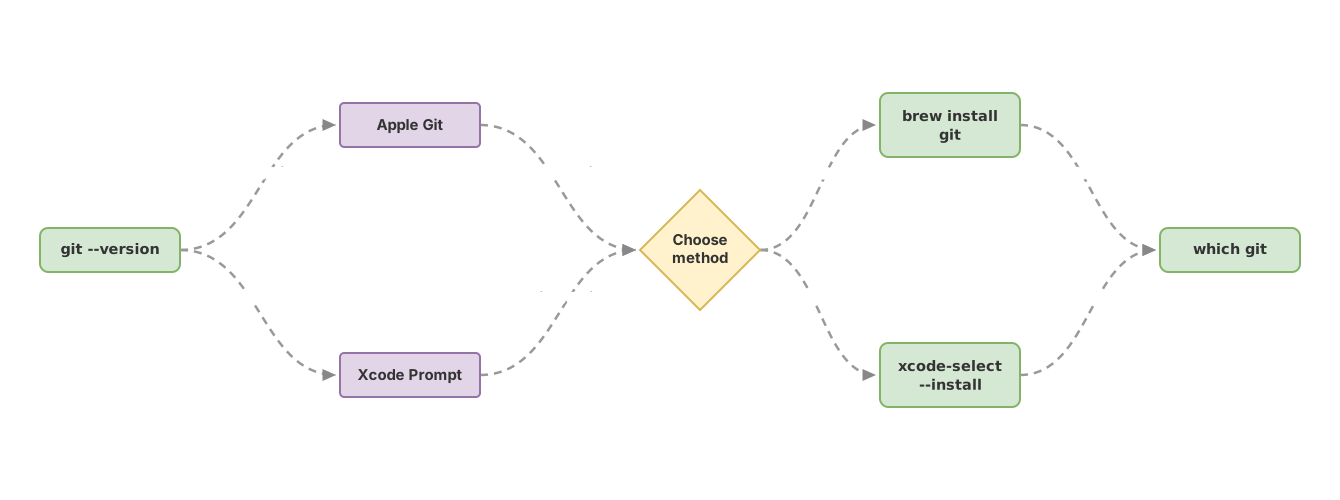
One of two things happens here. If Git is already available, you’ll see something like git version 2.39.5 (Apple Git-154). That “Apple Git” is the tell: it’s the version Apple packages, and it usually lags behind what the official Git project publishes.
The other option is that a system window pops up offering to install the “command line developer tools.” That prompt isn’t an error. macOS includes a small stub program that sits in place of git, and its only job is to trigger that window the first time you try to use Git without Apple’s tools installed [1]. The system is offering to install Git for you, not denying it.
Now it’s time to decide where you actually want your Git to come from.
Homebrew or the Xcode Command Line Tools?
Both paths work, and the practical difference is which version of Git you get and how you update it afterward. Before you choose, two quick definitions so you’re not copying blindly.
Homebrew is a package manager for macOS: think of it as an app store for command-line tools. You ask it for a program by name and it downloads it, installs it, and then lets you update it with a single command. It’s free, open-source software and widely used in the developer community.
The Xcode Command Line Tools are a package of development utilities published by Apple: they include Git, the clang compiler, make, and other pieces many projects need to build. Watch the name though: this is a small subset, not the full Xcode app, the massive environment for building iPhone apps that weighs several gigabytes.
Homebrew (brew install git) | Xcode Command Line Tools | |
|---|---|---|
| Git version | The latest from the official project | Whatever Apple packages, somewhat older |
| Updating | brew upgrade git, whenever you want | Tied to Apple’s system updates |
| What it installs | Just Git (and whatever else you ask for) | Git plus a compiler, make, and other tools |
| Who it’s for | Anyone who’ll use more command-line tools | Anyone who just wants Git without adding anything else |
My recommendation for anyone starting out and planning to code for real is Homebrew. You’ll need it for plenty of other things down the road, and having the latest Git version saves you surprises. If all you want is Git and you’d rather not add a new package manager, Apple’s version works just as well.
Option A: Install Git with Homebrew
This is the path I use myself, and it’ll leave you better prepared. It’s two steps: install Homebrew, then ask it for Git.
The Homebrew command needs to be copied exactly from its website, brew.sh, not from just any tutorial, because you’re running a script that touches your system and you want it to come from the original source. Here’s the command verbatim from the official page:
# Descarga y ejecuta el instalador oficial de Homebrew.
# Copia siempre esta línea desde brew.sh, no de terceros.
/bin/bash -c "$(curl -fsSL https://raw.githubusercontent.com/Homebrew/install/HEAD/install.sh)"
The installer will ask for your macOS password and tell you what it’s doing as it goes. When it finishes, it usually shows you a couple of lines “to add Homebrew to your PATH.” Don’t ignore them: on Macs with Apple’s chip, you need them.
With Homebrew installed, asking for Git is a single line:
# Homebrew descarga e instala la última versión de Git.
brew install git
And to update it a few months from now, without reinstalling anything:
# Actualiza Git a la última versión disponible en Homebrew.
brew upgrade git
This is where a detail almost no tutorial mentions comes in: the PATH. The PATH is the list of folders your Mac searches through for programs when you type a command. It goes in order and uses the first match it finds. On Macs with Apple Silicon (the M1, M2, and later chips), Homebrew installs everything under /opt/homebrew. On older Macs with an Intel processor, it uses /usr/local. The problem is that Apple’s Git lives in a system folder that usually comes earlier in the list, so your Mac can keep finding that one first.
That’s why the installer gave you those lines. On Apple Silicon, the fix is to make sure Homebrew’s folder comes first:
# Añade Homebrew al PATH en Macs con Apple Silicon.
echo 'eval "$(/opt/homebrew/bin/brew shellenv)"' >> ~/.zprofile
eval "$(/opt/homebrew/bin/brew shellenv)"
Close Terminal, open it again, and in the next section we’ll check whether you’re actually using the Git you just installed.
Option B: Install Git with the Xcode Command Line Tools
If you’d rather not bring in Homebrew, Apple gives you Git directly with a single command. It’s exactly what that window from earlier was offering, just triggered by hand:
# Instala las Command Line Tools de Apple (incluyen Git).
# No instala el Xcode completo, solo las herramientas de consola.
xcode-select --install
A confirmation window will open. You accept, wait for it to download (it can take a while depending on your connection), and once it finishes, Git will be available. There are no further steps and no PATH to touch, because this Git lives in the system path that was already on the list.
You already saw the trade-off in the table: it’ll be whatever version Apple maintains, and it updates on Apple’s schedule, not yours. For getting started, it’s more than enough. If you ever need a newer Git feature, you can always switch to Homebrew without uninstalling anything.
How Do I Check That Git Installed Correctly?
With two commands: one tells you which version you’re running, the other tells you where it comes from. Start with the version:
# Vuelve a preguntar la versión. Ahora debería salir un número, sin ventanas.
git --version
If you installed with Homebrew, the number should be higher than Apple’s Git. But a number alone isn’t enough, because your Mac could still be running the old Git. To be sure, ask for the path:
# Muestra la ruta exacta del binario de Git que se está ejecutando.
which git
If you see /opt/homebrew/bin/git (Apple Silicon) or /usr/local/bin/git (Intel), you’re using Homebrew’s: perfect. If instead you see /usr/bin/git, that’s Apple’s, and it means the PATH still isn’t prioritizing Homebrew. You can inspect the full list with echo $PATH; if /opt/homebrew/bin doesn’t show up near the beginning, go back to the PATH step in Option A. Once which git points to Homebrew, the installation is done.
Common Mistakes When Installing Git on Your Mac
These are the stumbles I see over and over with people just starting out. None of them are serious, but knowing about them saves you half an afternoon.
Thinking You Don’t Have Git Because the Xcode Window Popped Up
The “command line developer tools” window looks alarming at first, and a lot of people close it thinking something’s wrong. It’s the exact opposite: it’s macOS offering you the install. If you click install, you’ll have Git in a few minutes.
On Apple Silicon, brew install git Works but which git Still Points to Apple’s
This is the classic one. The command finishes with no errors, you assume you’re already using the new Git, and you’re actually still on Apple’s because /opt/homebrew/bin isn’t first in the PATH. The tell is that git --version shows a lower number than expected, or an (Apple Git-...) tag. Fix it with the PATH step from Option A and reopening Terminal.
Reinstalling When What You Want Is to Update
Months later a new Git version comes out and the reflex is to run brew install git again. No need: that’s exactly what brew upgrade git is for, updating what you already have without starting from scratch.
Copying the Homebrew Command from a Random Blog
The Homebrew installer runs with permissions over your system. Always copy it from brew.sh. A command pasted from some random site could have been tampered with, and you’re not going to read line by line everything it downloads.
What’s Next?
With Git installed you can get going; what comes next is configuring it. Before your first commit, Git needs to know who you are: your name and email, which get recorded in every change you save. That’s the natural next step, and it’s covered in the guide to setting up Git for the first time. Once that’s done, it’s time to create your first repository and start versioning real code.
If you’d rather learn all of this in sequence, with exercises instead of jumping between guides, the course Git de cero a profesional takes you from installation to working in a team with branches and merges, step by step.
Want me to let you know when I publish the next Git guides? Leave me your email and they’ll land in your inbox as they come out.
Sources
- Xcode Command Line Tools install prompt on macOS (Apple Support Community): confirms that macOS triggers the Command Line Tools install window when you run
gitwithout having them installed.
Frequently Asked Questions
Do I Need to Install the Full Xcode to Get Git?
No. Git comes with the Xcode Command Line Tools, a small package of console tools. The xcode-select --install command installs only those tools, not the full Xcode environment (which weighs several gigabytes). For working with Git in Terminal, the Command Line Tools are more than enough.
Is Homebrew Free and Safe?
Yes. Homebrew is free, open-source software maintained by the community. The one real precaution is installing it by copying the official command from brew.sh, not from a third-party site.
How Do I Update Git Later?
If you installed it with Homebrew, with one command:
# Actualiza Git a la última versión publicada en Homebrew.
brew upgrade git
If you have it through Apple’s Command Line Tools, it updates along with the rest of Apple’s tools, through system updates. You don’t have a dedicated command to force it.
Can I Have Both Apple’s Git and Homebrew’s at the Same Time?
Yes, and it’s actually the norm when you install Homebrew on a Mac that already had Apple’s Git. They coexist without conflict. Which one runs when you type git is decided by the PATH: whichever sits in a folder that appears earlier in the list wins. Use which git to check which one you’re using at any moment.
Is Installing Git the Same on an Intel Mac and an Apple Silicon One?
The commands are identical. The only difference is where Homebrew puts things: /opt/homebrew on Apple Silicon Macs and /usr/local on Intel Macs. That’s why the PATH adjustment mentions /opt/homebrew/bin; if your Mac is Intel, the equivalent folder is /usr/local/bin.
Related articles

Git from scratch: what it is, why it exists, and how to make your first commit
Git is a mental model before it's a list of commands you memorize. This guide covers everything from the why to your first commit, assuming zero prior knowledge.

Setting Up Git for the First Time: Name, Email, and Editor
The exact commands to configure Git before your first commit: user.name, user.email, the default editor, and what --global means versus local.

git init: Create Your First Repository Step by Step
Learn how to use git init to create your first local repository from scratch: what it does, how to make your first commit, and how it differs from git clone.